It ruins finishes, creates an unpleasant and clammy atmosphere, causes musty smells, threatens any adjoining woodwork, and continued presence of damp in walls is likely to lead to structural problems down the line.
Rising damp is an unpleasant and destructive problem that should be dealt with as soon as it is discovered. Getting professionals in to treat damp is undoubtedly the best bet, but this can be a relatively expensive undertaking. However, you can install a chemical damp proof course (DPC) yourself quickly, cheaply and efficiently.
Damp is the result of an inadequate DPC. There are several ways of installing new DPCs in existing buildings, namely:
- It is possible to cut out a layer of mortar and insert bituminous felt. - Ceramic respirators can be inserted into the brickwork to carry the damp away by evaporation. - Copper wires can be plugged into the wall to drain off the tiny electric currents that encourage water to rise up the wall. - The bottom courses of the brickwork can be injected with a silicone-based fluid.
For the DIY enthusiast, the last method is by far the easiest and most efficient way of dealing with rising damp.
The silicone injection system
Silicone is basically a wax with powerful water-repellent qualities and in DPC fluid, it is dissolved in a spirit base together with anti-fungal additives. To treat brickwork, holes are drilled into the interior and exterior walls at a certain level, then the DPC fluid is pumped into the holes until it displaces the water in the brickwork. Finally, the spirit base evaporates, leaving the waxy gel inside the pores of the brickwork and mortar. This cuts off and reverses the wall’s natural capillary action, forcing damp downwards and preventing the passage of external moisture.
Installing the DPC
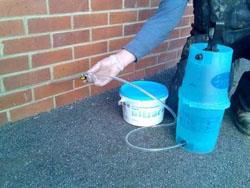
Professional DPC installers pump the silicone fluid into the wall, but although the pumps can be hired, they are messy and tend to waste much of the fluid.
An efficient way to inject DPC is to use an ordinary garden-type compression spray. With this, you simply remove the nozzle and insert the hose with an attached homemade bung that best matches the size of your pre-drilled holes. The bung is a rubber, cork-like stopper that holds a metal pipe, which runs right through the rubber cork. This metal pipe is then inserted into the rubber pipe and securely clamped together to ensure that the connection between the rubber and the metal pipes is airtight.
The bung will ensure that the hose is held in place in the holes, and that there is no “leaking” of the DPC fluid out of the pre-drilled holes. It is advisable to use bungs that measure between 16mm and 20mm in diameter.
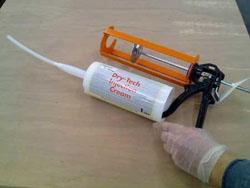
Alternatively, today you can buy the silicone DPC in tubes and insert it into the holes using a specially designed silicone gun, which offers a very easy cost-effective substitute. You will require approximately one litre of fluid per 300mm length on an averages solid wall. Because you will need to drill a great many holes in the brickwork, it makes sense to hire a medium-sized rotary hammer drill with pneumatic action and a clutch to save fatigue and jams. Buy a carbide-tipped masonry bit to match the thickness of the pipe you are using, and make sure that it is long enough to penetrate the wall at an angle.
Preparing the walls
In order to ensure the success of the treatment, you must remove any old or unsound plaster from the affected area, as well as the first 150mm to 200mm of rendering, and repair any cracks in the wall. Pour a thin mixture of concrete grout into any cracks and allow it to set before injecting the DPC. Similarly, rake out and replace any crumbling mortar, and replace any badly damaged brickwork.
Having prepared the walls for treatment, you can now begin to drill the holes. Standard, solid walls, up to 225mm thick, will only require a single hole. However, wider and cavity walls have to be drilled from both sides. The holes must be inclined downwards at about a 15 degree angle, and should stop about 25mm short of the other side. Internal walls may be only one thickness of brick, and in this case, drill shorter holes accordingly.
Drill the holes about 100mm to 125mm apart, staggered in two courses of mortar – in other words, drill a hole through the mortar at the end of each brick, in the wall’s two bottom rows of bricks from the ground up. It is essential that you ensure that you are working on the same brickwork on the inside walls as you are on the exterior walls.
Injecting the DPC
Start by hammering the bung tightly into the hole, but avoid applying so much force that the hoe is squashed. Insert the hose of your spray almost as far as the end of the hole and then simply pressurise the spray container and pump DPC fluid into the wall until the surrounding brickwork is saturated. This takes between two and five minutes and is apparent when the fluid comes to the surface of the wall. When all the holes have been treated in this manner, you need to allow the walls to dry out for at least three weeks, and in humid places like cellars, complete drying will take several months.
Making good
As the walls dry out, white efflorescent salts form on the surface of the brickwork. Clean the walls with a wire brush and then wait a few days to see if any more slat emerges. If you plaster over the salts, they will cause the plaster to lift from the wall.
When the wall is clean, paint it with a coat of DPC fluid up to the height of one metre on the exterior brickwork and all the exposed brickwork on the interior walls. You will now need to fill any holes with mortar and replace any rendering that you removed with a mixture containing waterproofing agent.
Finally, replaster the area in question using two coats of lightweight gypsum plaster with waterproofing additive.
Caution
DPC fluid is a dangerous, flammable substance. It must not be inhaled, and must be kept away from skin at all times. Always wear eye protection and heavy-duty rubber gloves when handling it. Take care to remove all floor coverings and protect any rubberised or asphalt surfaces, as DPC fluid dissolves asphalt and will bond linoleum to the floor.
Pictures courtesy of:
Damp Proofing Products Shop: www.dampness-info.co.uk
Readers' Comments Have a comment about this article? Email us now.


