Whether you are an expert or beginner DIY enthusiast, there are only basic power tools needed to make a simple storage headboard and no special skills required. However, if you already have plenty of DIY savvy, you can put your skills to good use by adding extra details or embellishments such as moulding or trim.

READ: Bedroom décor: customised headboards
Why a storage headboard is a good idea
For a bedroom that is small, tight, or lacking space, a storage headboard offers the perfect storage solution and will not take up valuable space on either side of the bed where you normally need a bedside table or two. It can also be made narrow to fit at the head of the bed without using too much additional space.
How to make a storage headboard
The ideal size of the mattress will be determined by the floor space available in a bedroom. Below are the standard South African mattress sizes for you to keep in mind.
1.Length of headboard
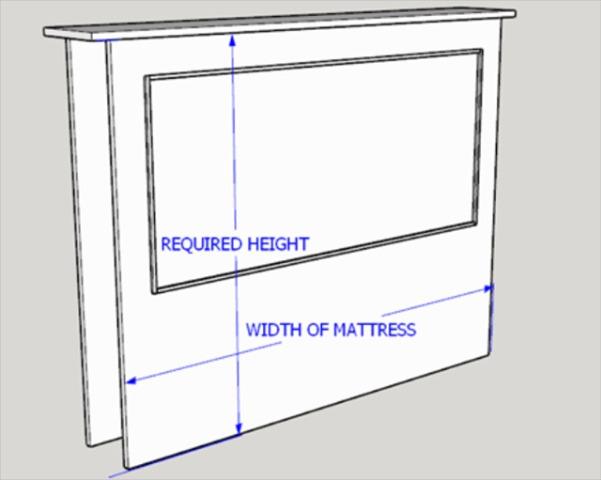
The size of the storage headboard is completely in your hands. I would suggest that you make it the width of the bed plus an extra 50mm on both sides.
2. Width of headboard
The width of the headboard is also fully adjustable - ours is 250mm from front to back but if you have a bit of floor space to spare, you can adjust the width accordingly.
3. Height of headboard
This is another reason why making your own headboard is a good idea. You can have it low, at a specific height - ours is 120mm - or even go from floor-to-ceiling.
Step 1 - Make the headboard frame
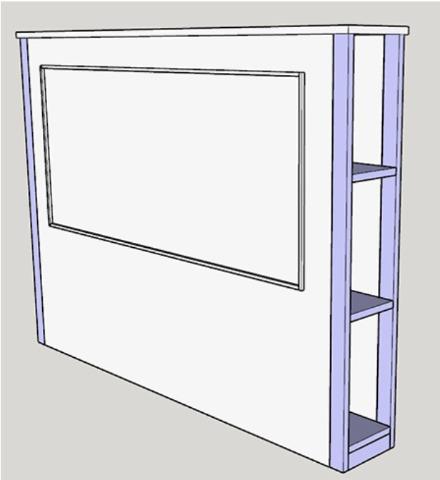
The headboard shown in the images at the top of this page is an easy one to make and it can be modified to fit with any mattress size with an easily adjustable height. Simply use the mattress width and add an extra 50mm at both sides to be able to slip in the shelf compartment that is shown in the diagram below. If you prefer a wider frame to fit behind the bed head, increase the width opening of the headboard frame that fits the shelf compartment.
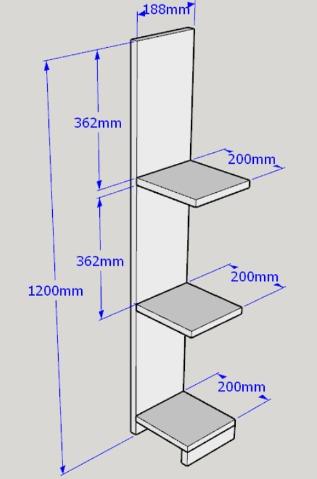
Step 2 - Shelf compartment
The shelf compartments are separate from the headboard frame so that they can be easily fitted into the sides of the headboard frame without any visible fastenings. If you have opted to make the storage headboard wider than 200mm, you will adjust the width of the shelf compartment accordingly.
Step 3 - Fitting bracket
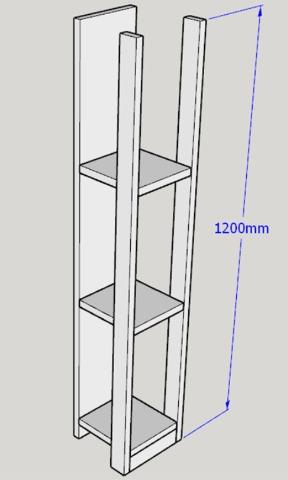
Two uprights are attached to the shelf compartment that allows it to be easily fitted into the headboard frame. The uprights, or fitting brackets, are then secured to the headboard frame using one of these methods: A) Using Biscuit joints allow the back of the fitting bracket and edge of the headboard frame or, B) Drilling pocket holes at the back of the uprights to screw into the headboard frame and finally, C) Drilling a hole through the front of the fitting bracket to allow you to drive a screw through the bracket and into the edge of the headboard frame.
To complete the assembly, slot the shelf compartment into the headboard frame and secure in place using your selected method in the step above.
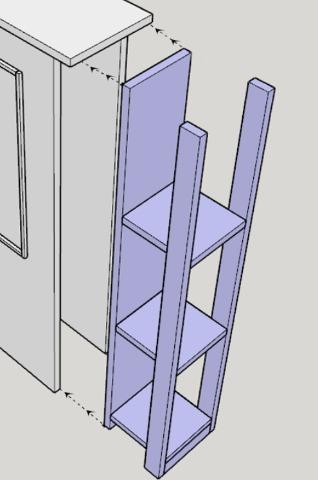
The completed storage headboard custom designed to fit any size of bed.
Article courtesy of www.home-dzine.co.za.
Want all the latest property news and curated hot property listings sent directly to your inbox? Register for Property24’s Hot Properties, Lifestyle and Weekly Property Trends newsletters or follow us on Twitter, Instagram or Facebook.

