Dress up your garden or patio with a shady, plant-covered pergola.
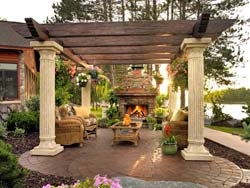
A garden pergola can add interest to all kinds of garden design, whether it encloses a small patio-type back garden or covers a walkway in a large landscaped area. The choice of site can quite radically affect the construction, so you should consider this first.
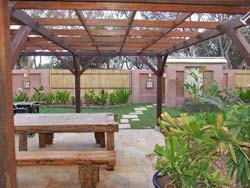
For example, a pergola over a patio attached to the house may best be built as a lean-to, supported on one side by the house wall. A pergola covering a walkway between two areas of the garden will be freestanding, but if it is along the edge of the stand you need to incorporate fencing along one side. If the ground is uneven, you can either set the tops of the posts level, or keep them the same length and have the pergola following the undulations of the ground.
Few points of the design, which is essentially an open skeleton, are critical: simply pick those features which best suit the pergola you have in mind and the materials you have available. But in general, you should work to measurements of approximately 2 500m in height, by a minimum of 1 500mm wide, so that you are guaranteed adequate walkway when the structure is complete and covered with plants.
Most of the materials specified in any pergola build comprise sawn softwood. This should be well-treated with timber preservative before the pergola is built, as it is often difficult to re-proof without disturbing the plants around it.
There are a variety of sealants that can be used for this kind of application, however, the best choice is arguably a water-based sealant, such as the Maxicare water-based sealant. Although it is slightly more expensive than other sealants on the market, it does offer a host of desirable benefits, including the fact that it has been specially formulated to withstand our harsh South African climate, it requires very low maintenance, it dries very quickly, its gel-like texture makes it exceptionally easy to apply and it is very durable - protecting the wood for up to 36months, without having to reapply.

Of course, pergolas can be made of other materials too, such as stone or metal, but this will cost considerably more than using wood. If made of metal, be sure to coat it with an anti-rust undercoat and then with a couple of coats of enamel paint to stop the metal from rusting. Stone is porous, but it can be left untreated and still withstand the elements beautifully – it can make a gorgeously long-lasting pergola structure. You can also use precast concrete pillars as the posts.
To build a wooden pergola, you will need to work out a plan that suits your individual space and size requirements. However, here is a basic work plan that can be adapted to serve your individual needs:
What you will need:
6 x 150mm x 150mm wooden posts for the uprights
6 x 250mm x 150mm x 4mm mild steel supports to hold the posts in place in the ground
8 x 150mm x 50mm beams, which will comprise the “roof” of the pergola
2 x 200mm x 50mm bearer beams, on which the above-mentioned beams will rest
Wood screws, nuts and bolts and nails

Method:
- Dig 6 holes measuring 350mm square and 500mm deep. There should be three holes on one side, measuring approximately 1 250mm apart. Then approximately 1 500mm from this line of holes, dig another three holes that exactly mirror the holes on the other side.
- Fit the mild steel supports on the bottom of each post and insert into the holes.
- Fill each hole with a 1:2:4 concrete foundation, which will hold the uprights firmly in place at a 90 degree angle to the ground.
- Once the foundations have set and the 6 x posts are securely in place.
- Secure the 2 x bearers to each line of 3 x posts. If the pergola will be a lean-to, set against the side of your home, then one side of the 2 x bearers must be securely attached to the side of your house for added support.
- Then secure the 8 x beams across the 2 x bearers at approximately 45mm intervals.
- Lastly, if so desired, you can lay a concrete floor or path under the pergola, which can be tiled or paved at a later stage.
- If you intend planting creepers on the pergola, you can add trellis or plastic-coated wire mesh frames to the uprights.
- Now plant your plants around the pergola – many kinds of plants are suitable – you can plant climbers, such as vines or rambling roses at the base of the uprights and border plants in between. Be sure to include some evergreen plants into the mix, so that your structure does not look bare in the winter months. - Antonella Desi