If you live in an older home, chances are you have ugly, bumpy walls. For some unknown reason there used to be a time when plasterers thought it was the 'in' thing to give walls a textured finish. It must have been ‘cool’ then but this is no longer fashionable as bumpy walls collect dust. Fortunately, there are ways to smooth out those bumps without spending hours or days sanding down the wall.
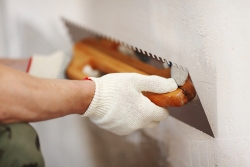 Where walls have inconsistent layers of texture, with high and low bumps, it is better to use a steel trowel beforehand to remove as much of the texture as possible.
Homeowners can use RhinoLite or Plascon’s Finishing Plaster, which allows them to apply a skim coat to a textured wall to give it that smooth finish. But before you rush out and buy the product, bear in mind that this is not a 5-minute quick fix and there are certain steps that have to be followed.
If you don't feel that you can handle this project yourself, take a look at the process involved and employ casual labour, or use the services of a handyman to do it for you.
1. Preparation
Where walls have inconsistent layers of texture, with high and low bumps, it is better to use a steel trowel beforehand to remove as much of the texture as possible.
While a skim coat will cover minor bumps and imperfections, it's not a miracle product, and any prep you can do in advance will make for an easier project with better results.
To ensure a proper bond between plaster and wall, for both products, an application of bonding liquid should be applied over previously painted surfaces.
2. Application
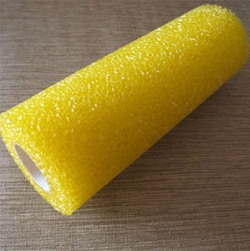 It is important to use the proper roller, a textured foam roller, which is available at your local Builders Warehouse.
The Plascon Finishing Plaster is a ready-to-use paste, while RhinoLite on the other hand needs to be mixed according to the instructions. Bear in mind that while both work well in a powered form that is mixed, this often dries faster than the ready-made one.
It is important to use the proper roller, a textured foam roller, which is available at your local Builders Warehouse.
The process of application is simple. Use the roller to apply the skim coat onto the wall. Work in small sections at a time, say about a 1sqm area, so that the skim coat doesn't have time to dry before you start working it.
A skim coat refers to the application of a layer of finishing plaster to smooth textured walls or cover up imperfections. A skim coat normally requires the application of two layers of finishing plaster, allowing each coat to dry thoroughly before applying the second coat.
- Use a special textured foam roller to apply mixed skim coat onto the wall.
- Working from the top of the wall down to the bottom, use a squeegee to lightly float the surface in one smooth, even stroke.
- The next stroke works from the bottom of the wall to the top, again applying a smooth, even stroke.
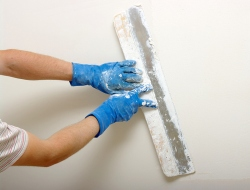 A skim coat normally requires the application of two layers of finishing plaster, allowing each coat to dry thoroughly before applying the second coat.
- Use a paint scraper to remove any excess plaster around the fittings.
Let the first coat dry and then lightly sand to remove any imperfections before applying a second skim coat.
Remember that whatever skim coat you choose, this has to be finished with a suitable primer.
3. Finishing
After application and once dry, the surface needs to be lightly sanded before a primer is applied. The ideal way to go about this is to use a flat floor cleaner and wrap a sheet of sandpaper around this so that you can sand large areas of the wall easily.
The process of applying a skim coat can also be used to cover up unsightly popcorn or heavily textured ceilings.
Good to know
If you want to try this yourself, practice on a small section of wall until you master the technique of smoothing.
Article courtesy of www.home-dzine.co.za.