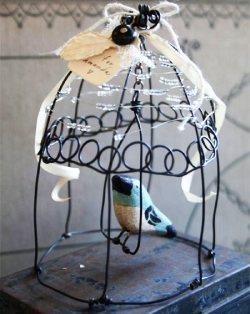
Wire bird cages are often uneven and imperfect, this adds to the handmade feel and gives them a lovely charm.
Decorative bird cages have been around for ages and making your own wire cage is a fun weekend project.
Here’s how:
1. Draw a circle 8cm in diameter on a piece of paper and divide this into six equal sections.
2. Cut a piece of wire to form an 8cm circle and twist the ends together.
3. Cut three pieces of wire - 30cm long. These wires will form the dome of your cage.
Twist the end of your first wire around your circle and crimp tight with your bent nose pliers. This will keep your wires from sliding around your circle.
Twist the other end of your first wire straight across on the circle.
4. Attach the other two wires following your diagram for the placement of the six wire ends around the circle.
5. To make the swing, cut a piece of wire 20cm long and shape it into an arch.
Hold your bird inside to be sure it will fit comfortably.
Twist one wire end around the top of the swing to secure.
Make a wire loop with the other wire end using your needle nose pliers. Thread a piece of chain on the wire loop and then twist the wire end around to secure and clip off any excess wire.
6. Hold the swing inside the cage to measure how long you want the chain to be. Mark the chain and clip.
7. Attach your bird to the swing. Wrap one leg wire around the swing. The wire legs are short, only about 5mm long after wrapping. To be sure your bird doesn't slip forward on the swing crimp the wire to secure it and then clip off any extra wire.
Repeat for the second leg wire.
8. To hang the swing from the top of your cage cut a 10cm piece of wire and bend it slightly in the centre.
Slide the chain attached to the swing onto the wire and let it fall to the centre bend.
Slip one end of the wire under the top of your cage where the three wires cross right in the centre.
9. Twist the wire ends around to secure the chain for the swing and then use the needle nose pliers to curl up the wire ends.
Twist two more wires around the top and curl up the wire ends for a total of six curled up wires.
10. To make the wire loops, twist the wire around a paintbrush, remove the paintbrush and place it next to the loop and wrap the wire around the paintbrush again to form another loop.
Keep forming loops until you can make a circle of wire loops that will fit around the top of your cage. Slide the wire loop circlet over your wire cage and secure it by bending the loops around each of the six dome wires.
Working with wire forms will cure you of any perfectionist tendencies. I try to shape the wire so it is fairly even and symmetrical, but there is always a bit of wonkiness about it. I think this just adds to the handmade feel of your piece and gives it a lovely charm.
Now it is time to add a bit of fun if you like. I tied some vintage ribbon around the top and let it curl down both sides. I threaded silver lined seed beads on a spool of very fine silver wire and wrapped it around the top of my cage leaving the beads to slide along the wires for some sparkle and a little movement.
Article courtesy of www.home-dzine.co.za


