Why keep all your treasured memories in a photo album that nobody looks at – a large gallery of family photos is a great way to infuse a room with character and aesthetic appeal.

A photo wall is easy to create and it is a project that can be completed in a weekend – here is how:
Choose your style
Decide on a style that is in line with your home’s current décor and move forward from there. If you live in a contemporary minimalist abode – choosing frames with straight, clean lines and solid colours, hung in symmetrical square or rectangular formation, is a great choice.
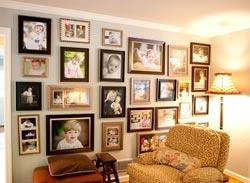
On the other hand, if you live in a space with more of an old world, eclectic feel, then you can choose all sorts of rustic and interesting frames, and group them together in more of a haphazard formation for a dramatic effect. For a more classical appeal, choose traditional frames that are all the same style, perhaps in different sizes, and group them together in well balanced groupings.
Choose a theme
Whatever style you opt for, it is also important to choose a theme that ties the whole collection together. For example, you can opt to have all the photos you choose in black and white or sepia, or the photos you choose can all be printed in exactly the same size. Ideal for a stairway, you can choose a chronological theme that runs up the stairs. Or alternatively, you can choose to print photos of a certain occasion or photo shoot – such as a wedding, a birthday or a trip overseas.
How to create the arrangement
An easy way to create an arrangement is to create paper cut-outs of the frames you have. Simply place the frame face down on a piece of brown paper, trace around it with a pencil and cut it out. Be sure to mark where the nail must go to hang these frames onto the paper as well. Arrange these cut-outs on the wall with Prestik, until you are satisfied with the formation.

Now you can drill the screws or hammer the nails in where they should be directly trough the paper. Once the nails or screws are securely in place, you can remove the paper from the wall one by one, and gradually hang the frames in place. Be sure to hang each frame directly after the paper of that cut-out has been removed so that you don’t forget which frame is positioned where.
Achieving straight rows
A laser level is a great way of hanging frames in straight rows. However, if you do not have one, don’t worry – all you need to do is to stretch string between two nails. Use a spirit level to make sure that the line between the two nails is absolutely straight. You can run a criss-cross of horizontal and vertical lines to ensure a neat, geometric formation for a sophisticated and timeless composition.
A space-saving solution

If you are short of wall space, you could choose one type of photo frame with straight square or rectangular sides, and stack all the photos together so that all the sides touch one another and there is no space between each frame. This creates the feel of one big mosaic, instead of many little frames and makes a great focal point in any room.
Alternatively, you can consider a collage frame, which is one large frame that is bought complete with various cut-outs designed to house a number of pictures. They are a great space-saving solution and are available for both wall hanging and as a table top display. – Antonella Desi
Readers' Comments Have a comment about this article? Email us now.