They leave woodwork in view, and they're quickly adjusted to show as much of the shade pattern as you want, so you can change the look with a flick of a wrist. Let the ideas and techniques shown here inspire your own showy shades.
For a balanced design, repeat a bedroom motif and colour scheme. Borrow patterns from bedspreads, borders, and upholstery.
Use water-based acrylic crafts paints. The paints used on the shades in this project are adaptable to other surfaces such as lampshades, furniture, and floors. Experiment first. If possible, work on a spare shade or remnant to practice your technique, test paint absorbency, and explore colours.
Geometric stripes
 This geometric pattern adds movement to a room. Dab colour with varying pressure between taped-off lines. To change the look, use different tape widths and work in the existing shade colour as one of the stripes. Add a final touch with squiggles, accomplished with a stiff, dry, round-tip brush. Push the paint into the shade fabric to leave a strong, solid line. The shade tabs extend the stripes and help guide design placement.
 Apply blue masking tape to mask the stripes that will remain unpainted. If the shade has tabs, use them as guides for stripe spacing. Depending on the shade you choose, you may vary width, number, and colours of stripes.
 Fern fantasy
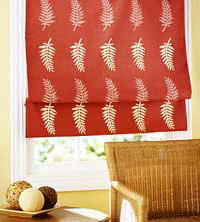
 Light-colour paint on a cranberry shade creates dramatic contrast at this window. To align the ferns, first tape and mark horizontal and vertical grid lines. When positioning the design, place the same part of the stamp (such as the tip of the fern) at the same point every time. For accurate placement of a store-bought stamp such as this one, gently remove the foam backing and replace it with clear Plexiglas.
How to dry-brush stencil
Squeeze a 50 cent-size dab of paint onto a paper plate. Dip a dry stencil brush into the paint. Scrub the loaded brush onto a paper towel to remove as much paint as possible. Apply paint, moving the stencil brush in a circular motion.
For more information click here to visit the website.
Property News
Click here for more property news articles.
Need a blog?
Start your own blog with a free blog from 24.com.


